I have many times been asked how we auto feed our @bitrebels Twitter account with fresh content every time something gets published, and how you could do the same thing. Well, the answer is, unfortunately, not as easy as I am sure you would like it to be. Over here at Bit Rebels we’re actually utilizing the Twitter feature of our RSS feed over at Google’s Feedburner. It lets us automatically update our Bit Rebels account when a new article is published on the site. This is; however, only for people who have their own RSS feed, and it doesn’t apply to people who just want to post fresh non-repetitious articles from blogs and websites they like post to their Twitter feed.
However, there is a way to accomplish what you’re after, and I am going to show you how to auto feed with Bit Rebels as the example in just three simple steps. Following each of these steps will enable your Twitter account to automatically update with fresh content from Bit Rebels every time there is something new published. You have the choice to set what time interval your account will check for new content so you will be in one hundred percent control of how often your Twitter account will be updated. Also, no worries about articles being repeatedly tweeted. This particular solution will only tweet the newly published articles once.
We are going to use TwitterFeed as our tool to auto feed our Twitter account with fresh Bit Rebels content. It’s amazingly easy so just follow the steps, and you will be rocking fresh content in no time on your Twitter account.
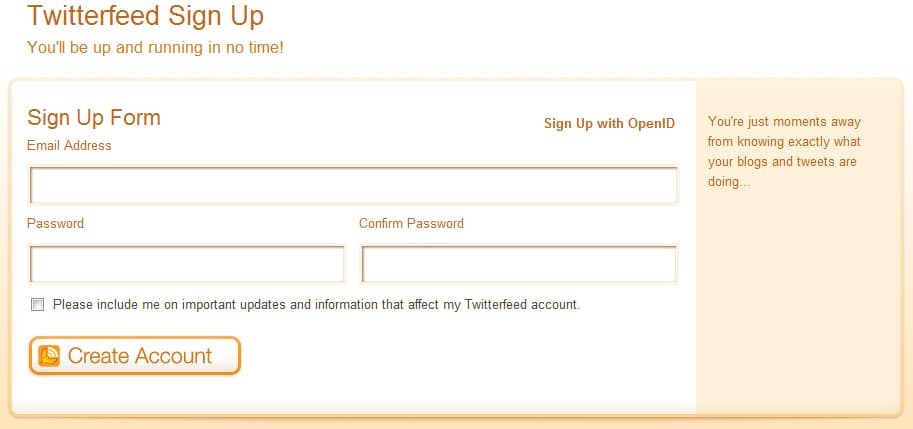
STEP 1: Signing Up A New Account
The sign up process is among the easiest you will come across. All you really need is a valid email address and a password, and you’re all ready to go. Just fill out your details in the form and click “Create Account“.
STEP 2: Adding RSS Feed To Auto Feed
Now it’s time to add the website RSS feed that you want to pull the fresh content from. In this example, we are using the Bit Rebels RSS feed which is https://feeds2.feedburner.com/bitrebels. First name your feed. Keep it simple so you can easily locate it if you have a lot of sites you are auto feeding content from. Just copy the entire URL into the “Blog URL or RSS Feed URL” field.
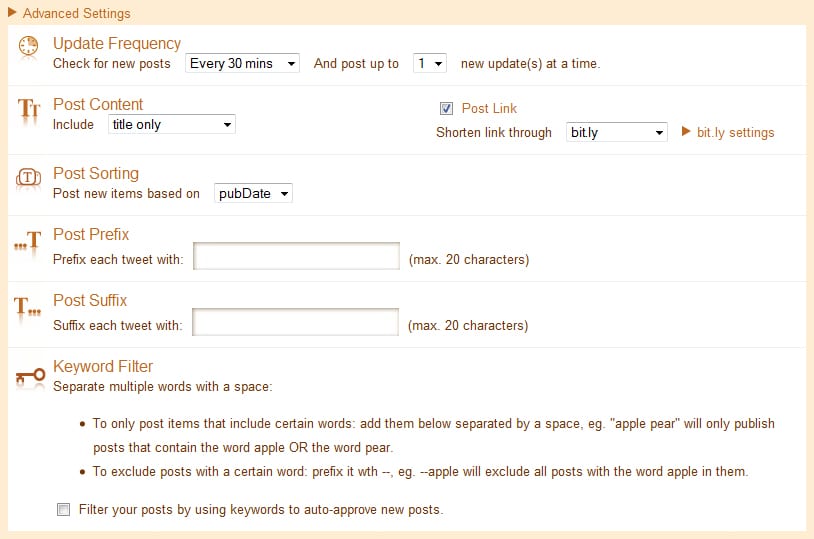
Underneath the form you will find “Advanced Settings,” click it to reveal further settings. There are quite a lot of different settings which will enable you to customize the way your social networking accounts post the content.
Update Frequency: This is the frequency that your Twitterfeed account will check for new content on the RSS feed to auto feed you have applied. Leaving it at “Every 30 Mins” makes sure you don’t miss anything if there are articles published that are urgent or breaking news. If there are no new articles published, of course, your account won’t auto feed anything.
You can let your Twitterfeed account post more articles less frequently by changing the time interval it checks for new articles, and then when it does post, it will auto feed and tweet more of them at once. We suggest you keep it at one at a time.
Post Content: This indicates what your Twitterfeed account will pull from the articles to auto feed and post on your social networking services. Change it to “Title Only” to make sure you only publish the title of the article and the link to it.
“Post Link” is always supposed to be checked as it will otherwise not include the link to the article which would make the fresh auto content feed setup kind of pointless.
You also have the choice to change how you want to shorten the link. Leave it at “bit.ly” if you don’t prefer any other shortener.
Post Sorting: This is the way your articles will get sorted in your list.
You have the choice to add a prefix text before and after your post, but that is entirely up to you of course. Some people put “(via @bitrebels)” after the post but it is not necessary.
The Keyword Filter choice you can just leave as it is.
When done click “Continue to Step 2” to proceed.
Step 3: Adding Twitter Services
Now it’s time to add the services that you want to auto feed fresh content to. You will have a list of 4 available services. Before you click the “Twitter” choice, make sure you are logged in to your Twitter account. You can, of course, authenticate your Twitter account by clicking the “Authenticate with Username & Password” but if you’re already logged in, it’s a little bit faster.
Now click the big “Authenticate Twitter” button and allow Twitterfeed access to your account to feed it with fresh content.
When done click the “Create Service” at the bottom of the screen.
Your automated fresh content feed to your Twitter account is now all done. If you want to add more services, just follow step 3 in this tutorial and you can add as many as you want to auto feed from.
Now click “All Done!” at the bottom of the screen to finalize the process. Now you will always see what has been tweeted on your “Dashboard.” You’re all set to rock the new year with fresh content. Congrats!
Header Image Source: [Josh Seman]


COMMENTS